Showing posts with label ADSK. Show all posts

Wednesday, September 7, 2016

Fired up over Hydrants


Hydrants are a feature people have been wanting since pressure pipes were added to Civil 3D, but have you ever tried to place one in your drawing? Where are the darn hydrants? There is a Hydrant category under the PVC parts list, but you have to manipulate the settings, like all the great functions in C3D, in order to find it. Here’s how we “put out the fire”, and added the Hydrant to our parts list.

Start with setting your ‘Pressure Network Catalog’ to PVC. To do this, from the Home tab, click the drop down next to ‘Create Design’. The tool on the lower left of this pull down will allow you to change what parts catalog you are using. Select PVC.


Return to the Home tab and click on ‘Pipe Network’, select ‘Pressure Network Creation Tools’. When the ‘Create Pressure Pipe Network’ dialog box pops up, under ‘Parts List’, select the drop down next to ‘Edit Current Selection’, and select ‘Create New’.


This prompts the ‘Pressure Network Parts List’ – “New Part List” function to appear.  Name your parts list. If you have ample time you can opt to choose your materials, select what pipes, fittings, and appurtenances you want to use. If not, just simply give the new list a name allowing you to move on to actually locating the elusive Hydrant… 

Right click on your newly created parts list and click on ‘Add type.’  At the bottom of the list is the Hydrant – click on the plus sign to expand the Hydrant category and select the Hydrant by clicking the box to the left. Click ok to save.


Click on the box next to ‘Hydrant_MJ’.
  
Don’t stop here – you still have to select the size of Hydrant. We weren’t joking when we called it elusive.  Expand your “New Parts List” and right click on Hydrant_MJ. Select ‘Add size’ and select the  ‘Add all sizes’ option, as shown below.
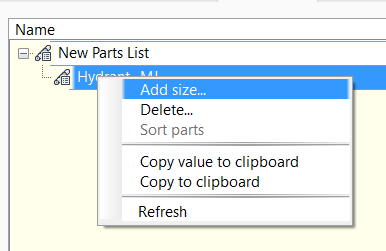


To add a hydrant to your design, draw your pipe network, select the hydrant on the dropdown for appurtenances, and click on ‘Add Appurtenance’. You can now click on your pipe network and add in a hydrant where you need one.


With that, you can now add fire hydrants to your drawing! Check out the video below to see all of the steps described, and others available at ADSK Solutions. For further training and questions, please email info@ADSKsolutions.com.

-Tyler McMillin, E.I.T.


UAV to Civil 3D - GIS Mapping

Just posted to our YouTube channel, 'Adding a GeoTIFF to Civil 3D':

This video shows a GeoTIFF captured by our UAV, and delivered in Civil 3D. We used ReCap 360 to process the data.


-Tyler McMillin, E.I.T.

Saturday, June 29, 2013

Civil 3D 2014 Update

I was working in Civil 3D again today. Yes it is Saturday and I was trying to get some work done when Autodesk provided me a balloon notification to update my Civil 3D 2014 software because it was out of date. I clicked the click and it brought up the image below. Selected update, read the readme. Yes I did do it and software is up to date. The readme displayed many reasons to install the hotfix. Most solutions were to enhance stability.


While I waited for the install to complete I searched for other important updates and solutions.

GIS professionals = MAPIMPORT or MAPEXPORT doesn't work
Point Cloud professionals = AutoCAD Reality Capture Memory Leak Hotfix
 Review most recent updates and solutionsCivil 3D Updates & Service PacksTroubleshooting

Thursday, February 2, 2012

Point Cloud Feature Extraction for Revit

Site/Building Footprint Extraction
Autodesk Labs has just released free software to extract Revit data from point clouds. I was reviewing this software to manage, display and extract building data from point clouds. As I was doing this I came across this impressive video on extracting Site/Building Footprints. Autodesk Labs video. To sum this up with one word UNBELIEVABLE!

Remember when Autodesk Labs released Point Cloud Feature Extraction for AutoCAD Civil 3D? (now retired) I would select the point cloud to build a surface and it included all of the trees and utilities. The TIN could not be used for anything.
So I immediately put this new Revit tool to the test. Keep reading I never thought I would use REVIT to build a surface and export it to CIVIL 3D.

Lets get started; Open REVIT and insert the Point Cloud from a simple PTS file.


 Click Feature Extraction from the new TAB and click Site Surface.            
Position the point cloud in the front view like the video displayed and select the ground features.                                                                                                                                                                                               

Image shows resulting point cloud with contours. Notice the wall in the bottom left, and the trees on the site. It automatically excluded these objects. Review the front view below it did not include the trees

 Front view of the surface to show walls and trees were not included.


Couple other helpful tools provide the ability to crop and un-crop the surface. The picture below show the command to turn the point cloud display off.  


 Once the point cloud was turned off I used the Navisworks plug-in to export the surface to Navisworks. 


This command is very simple to use and provides an incredible tool for Revit users to build quick topographical surfaces, but how do we get this surface into Civil 3D?
I will provide steps to utilize this surface in Civil 3D later in the week and will link a video to this process soon.